2.28.2013

Faux Pho.

Here is my version of the classic Vietnamese soup, Pho. Most of you are familiar with it, and to those who aren't, I'm truly sorry. Making Pho is traditionally a long and painstaking process that involves boiling meat and bones with spices to create a rich broth, but I have streamlined that process into a much easier task which still yields a pretty tasty soup. Also, my base recipe is completely vegan. I have included tips and ideas for those who might wanna add some meat and such.

Also, this recipe is specifically designed to make your life easier. By all means, if you want to buy some oxtails and spend a couple of days working on a batch of traditional Pho, knock yourself out! You will have my full and utmost respect and admiration. However, in my house, ain't nobody got time for that! My recipe takes anywhere from an hour to 2 hours, depending on how long you want to simmer your stock. It serves up to 4 people. You have my absolute permission to change, modify, embellish, or adapt it in any way. The point in cooking yourself is, after all, to create something that you love.

You will need:

a large pot with lid
a strainer of some sort, or cheesecloth
a large bowl
large serving bowls

1 onion, unpeeled, roughly cut into eighths
Use the peels and all!
1 large shallot, unpeeled, quartered (optional)
6 to 10 garlic cloves, unpeeled, squashed with the edge of a knife
1 teaspoon Chinese Five-Spice Powder*
10 cups vegetable stock (or chicken or beef...feel free to use more or less)

Bragg Liquid Aminos or soy sauce (optional)
fish sauce (optional)
salt & Pepper

rice noodles, cooked**
bean sprouts
fresh basil (Thai basil is best, but any works)
thinly sliced serrano or jalapeno pepper
sliced green onions
lime wedges
hoison sauce
Sriracha sauce (or your favorite hot sauce)

Place the onion, shallot, and garlic (peels and all) in a large pot over medium heat and "dry roast" the vegetables for several minutes until they are browned, softened, and charred, stirring occasionally. Don't use any oil...the bits that stick to the bottom will make your broth amazing. 

Easy shortcut.
Sprinkle the 5-Spice Powder over the veggies and stir for a few seconds to allow the spices to toast slightly. Immediately add a cup or two of stock and stir well, scraping any stuck bits off the bottom of the pot. Add the rest of the stock and bring to a light boil. Reduce heat, cover pot, and maintain a gentle simmer for at least 25 minutes, and up to an hour.

Now we have to strain the broth and remove the solids. I pour mine into a large bowl (or another pot) through a mesh strainer. You may also use a few layers of cheesecloth. If you don't have either, run to the store or get creative. If you end up with particles in your broth, it isn't the end of the world. Discard the solids (or if you can find a creative use for them, bravo!) Return the broth to the pot and return the pot to the burner. You may season to taste with Bragg seasoning, soy sauce, fish sauce, salt, pepper...whatever you like. Bring it back to a soft boil. Your soup is now ready to serve. (This portion of the process can be done in advance. You can let the broth cool and refrigerate it until you are ready to serve. Simply heat it up and continue for a quick meal!)

To serve, put rice noodles, sprouts, basil, green onions, peppers, and whatever else you like in the serving bowls and carefully ladle the super hot broth over. The broth will slightly "cook" the vegetables in the bowl, which is why it is important that it is hot. Garnish with hoison sauce, a squeeze of lime, and Sriracha, and enjoy!

Pile ingredients on a platter for a fabulous presentation!

*If you wanna go all out, replace the 5-Spice Powder with 2 cinnamon sticks, 2 whole star anise pods, 4 cloves, and about an inch of fresh ginger, coarsely sliced.

**Prepare noodles according to package directions. For best results, time the rice noodles so that they are hot when you add them to your bowl. For convenience, you may cook them, drain them, then keep them in a pot of cool water until ready to use.

Tips:

- Use big serving bowls so you can cram more veggies in without cooling the soup too much.
- To make things even easier, keep a stock paste on hand in the fridge. You will always have instant stock in a flash.
- This recipe can be easily doubled. Just double all the ingredients, and follow the same cooking times.
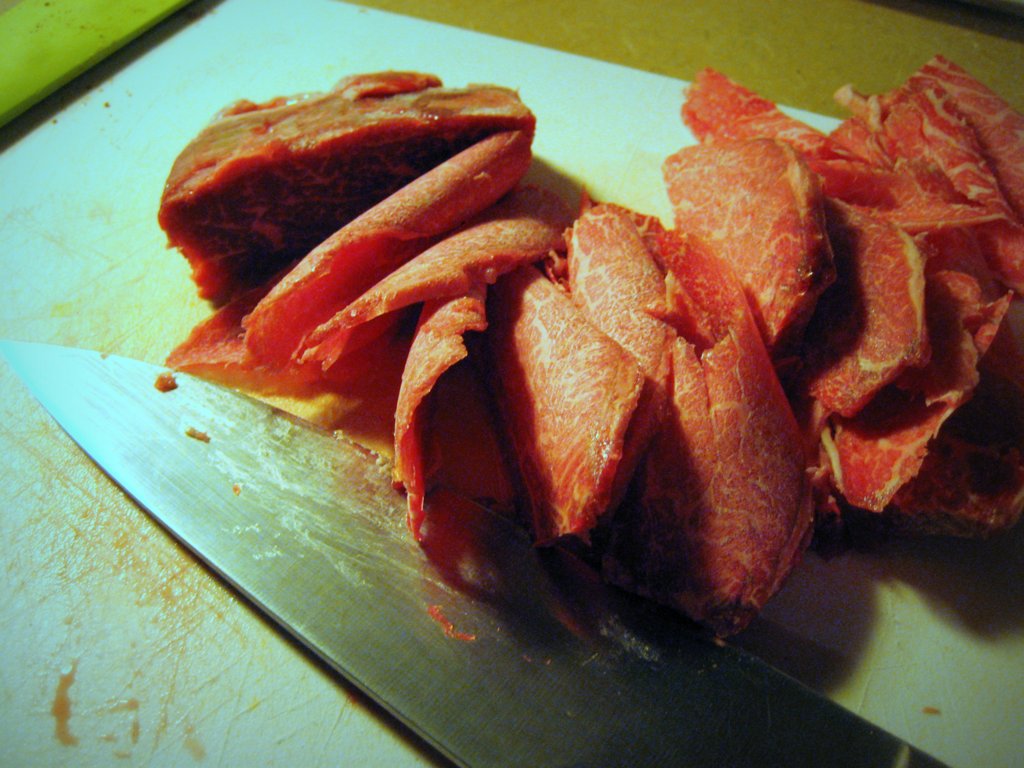
Paper-thin beef.
Ideas:

- Jeff and I like beef in our Pho. I get a steak and place it in the freezer when I start cooking. When it is firm, I use a sharp knife to make paper-thin slices (against the grain). Place the raw beef in the bowl with the veggies, and the broth will cook them perfectly.
- Tofu is a great addition! Slice it thin. For best results, press the excess water out first.
- Plan ahead and make a big batch of broth for the freezer. When cooled, divide the broth into individual servings and freeze! You can have Pho in a snap anytime.
- Chicken wings make a great addition to the recipe. Toss a few in with the onions and garlic and cook with the broth. Just remember to remove and save them before discarding the solids. Place the cooked wings in the serving bowls.


2.25.2013

Jeff & Jeff's Granola.

Perfect.
I mentioned to a friend recently that Jeff and I make our own granola. Her response was "Wow...you must reeeally have a lot of time on your hands." While she is correct (I do) the process really only takes a few minutes, and the result is well worth the effort. Store-bought granola is expensive and overly sweet in my opinion. Plus, I can never choose because there is never one type that has everything I want in my bowl.

The greatest thing about making granola at home is that you can experiment, adjust the sweetness, go crazy, try different grains, and customize each batch to suit your perverted cereal desires. Here is my basic recipe. It makes about 5 cups or so. I typically double the recipe each time I make it, because it keeps for days in an airtight container. And, do you know what makes a fabulous gift for someone you love? A bag of your homemade granola, that's what! (Put a prize in the bottom of the bag for extra brownie points. You're welcome.)

You will need:

3 cups old-fashioned rolled oats (not instant)
1 cup coarsely chopped or whole raw nuts (if using roasted ones, add them after cooking the granola)
1/2 cup unsweetened shredded coconut*
2 Tablespoons packed brown sugar
3/4 teaspoon ground cinammon
1/2 teaspoon ground ginger
1/4 teaspoon kosher or sea salt
1/3 cup honey
2 Tablespoons vegetable oil
1 cup dried fruit

Preheat oven to 300° and line a rimmed baking pan with parchment paper (not necessary, but well worth the investment...add it to your grocery list if you don't have it!). Mix the first 7 ingredients in a large bowl. Heat honey and oil and stir until smooth and thinned. You may do this on a stove top or in a glass measuring cup in the microwave. Drizzle the honey mixture over the dry ingredients and toss to combine. Spread the granola on the baking pan. Bake until golden brown, stirring every 10 minutes for even cooking, for about 40 minutes. Remove from oven, stir one more time, and let cool completely. Mix in the fruit and store in an airtight container at room temperature.

*Any health food store should have unsweetened coconut. It not, you may use the sweetened kind. Just make sure to reduce the amount of brown sugar to half.

Ideas:
-Try sliced almonds, whole cashews, walnuts, pecans, peanuts, or whatever nuts you are nuts for.
- Add more or less coconut depending on what you like. I can't get enough.
-Try adding in 1/4 cup chia seeds, sesame seeds, wheat germ, or oat bran before baking.
-For variety, toss in a cup of bran flakes, corn flakes, or any ready to eat cereal after baking. 
-Yes, this recipe can be made with less sugar, no sugar, more sugar, white sugar, no oil, etc.
-Try substituting a mixture of molasses and honey, or agave syrup, or maple syrup.
-Get creative with spices. Add more or less. Try things like pumpkin pie spice, or a spoonful of vanilla extract in the honey.
-Yes, you can eliminate the salt all together.
-Try raisins, dried cranberries or cherries, banana chips, dried pineapple, dried blueberries, chopped dried mango, candied ginger, chopped dried apricots, prunes, dried figs...whatever you like!
-For sugar free granola, adjust the recipe according to your needs, and add your own sweetener before eating.
-When finished baking, fold up your parchment paper, put it away, and use it again for your next batch.
-For gifts, package your granola in coffee bags and make your own labels!


Enjoy!


2.24.2013

Strutter, indeed.

In December, I ran across this Color Changing LED Light Bulb on Amazon. It seemed too good to be true (for the price), but I ordered one anyway with the hope of aiming it at my disco ball and witnessing something amazing. It even comes with a remote control! Though it did not arrive in time for my New Year's Eve party (I didn't realize it shipped from China and would take 5 weeks), it did not fail to impress. The bulb screws into any standard socket, and can be turned on and off with the remote. The remote allows you to choose 15 different colors including white, 4 patterns (fade is the best), AND the brightness of the light. Crazy.

Oh, and did I mention shipping is FREE? My only regret is not ordering a hundred of them. Check out my hot and sexy video of Imogen Love, dressed as a Sea Monkey, basking in the magical light that is...the Color Changing LED Light Bulb with Remote Control. Then order a few of them.


You're welcome.


Green Chili Chutney.

Here is your first recipe. I found this in Neelam Batra's "The Indian Vegetarian" cookbook and tweaked it slightly for my own taste. It's kind of a staple in my house now. Let me explain why you might want to make it...

1. It's incredibly simple.
2. It's good on just about everything that isn't dessert. Consider it an alternative to hot sauce.
3. It's beautiful and makes a fabulous gift for spice lovers.

Hot & Sour Green Chili Chutney
You will need:

A clean jar with lid

1/4 cup thinly sliced serrano or jalapeno peppers*
1 Tablespoon kosher salt (or sea salt)
1/2 cup red wine vinegar (or your favorite vinegar)
1 teaspoon coarsely ground roasted peppercorns**

Mix the peppers and salt in a jar, and set aside for 2 or 3 hours at room temperature. Pour in the vinegar and add the peppercorns. Store at least 24 hours in the refrigerator before using. The chutney will keep for months if refrigerated.

*Wear gloves or at least wash your hands thoroughly and immediately after handling peppers! Do not forget or you will end up touching your lips, eyes, nose, or...worse...and sincerely regretting your laziness.

**To roast whole black peppercorns, put them in a dry pan over medium heat and stir occasionally until they begin to smoke and pop. Remove from heat, let them cool, and grind. If you don't have a grinder, place them in small plastic bag on a cutting board and crush with a rolling pin, heavy glass, hammer, laptop, or whatever.

Yawn.

I was awake for hours last night wondering how to approach my blog this time around. Should it be all recipes? Should it be a photo gallery with recipes? Should I include stupid stories and pictures of my cats doing those things that all cats do? You see, I've done this a hundred times. I get an idea, I get hung up on one photo that I wanna display somehow, then I spend a whole day setting up my brand new blog only to forget about it by the week's end. It's really no big deal, because honestly, at the end of the day, no one cares. But I do kind of want a little tiny space, besides Facebook, to share the things that make me happy. And I want it to be special...if not for anyone else, then for myself.

Gus & the sunshine.
So, I took a deep breath, cleared my head, and I asked myself "Why would I visit someone's blog?" The answer was for inspiration and to learn new things. That's when I figured it would be best just to keep it simple and offer just that...things that might inspire others to travel, cook, or create...things that they might not know. For example, do you realize that if you crumple up your parchment paper into a ball and then straighten it again before placing it on your baking pan, it will lie flat and won't curl at the edges? Because I did NOT know that until recently. And it changed my life. Granted, I am seriously impressed by the "little things" most of the time, but tips like that can potentially add years to a person's life! Hopefully, you can find something here that enriches your life a bit as well. Whether it IS a photo of my cat, mid-yawn, a recipe, a mind-blowing kitchen tip, a travel story, or simply a link to something wonderful, I do plan to step up and provide! Feel free to subscribe, share, or follow me if you'd like. And be sure to try a recipe or two, because good food is awesome.

2.23.2013

Here we go again.

Sunset in Long Beach, WA 2/13

Okay. Maybe I'll give this blog thing another shot. It's a brand new year, and I once again have time on my hands (I will never take that for granted again).